Monday, June 8, 2015

Now we wait

Friday and Saturday saw the planting completed. The girls helped me put the starts in the ground and sprinkle the seeds into the rows. I think the ones Penny helped me with will have to be thinned as she tended to dump the seeds rather than sprinkle. Also some of the seeds may have washed away with some slight over watering.

Overall, the garden is a success thus far. I can hardly wait to see the starts coming up.


Penny and Lucille watering peppers, tomatoes and onions

Penny watering the starts before we put them in the ground

Thursday, June 4, 2015

Urban Gardening

I feel very lucky to have access to such a strong community garden program here in Racine. The town I lived in in Illinois had a community garden, but only ten plots available for the entire city which came with a waiting list as long as my arm. The first two years I tried to participate, I didn't make it to the top of the waiting list. 

When I came to Racine, I looked for a garden and didn't expect to find much but was pleasantly surprised to find the Racine Urban Garden Network. What a great group of people! They have all of the characteristics I look for in a group - a great sense of humor, a purpose and organization. Where else could I go to a "Plotluck" to choose my plot for the year? The group serves the city of Racine and provides 10 locations from which to garden as well as several partner locations that are specific to the community served.

The RUGN works "to continuously provide people in Racine with the necessary education and tools to grow their own healthy food." They offer weekly workshops in the spring to help members get ready for planting, volunteer and community opportunities to network and improve the gardens for all users, The RUGN Facebook page is actively maintained and has information not only about the gardens and the network, but articles about urban gardening. 

Here is a link** to some books on urban gardening. This one: Mini-Farming: Self-Sufficiency on a 1/4 Acre** appeals to me. While I don't have any desire to go "off-grid", I do like the idea of producing more of what I and my family consume. I don't have enough of an understanding of how GMO's and mass-farming techniques impact us to feel wholly comfortable voting for those things with my spending.


If your city doesn't have a community garden, here is a checklist to get started as well as a start-up guide provided by the University of California Cooperative Extension in Los Angeles County.

Wednesday, June 3, 2015

Garden Progress

Yesterday Penny and I got the garden beds weeded and prepped so I can get plants and seeds in tomorrow.  Let me correct myself, I pulled the weeds and Penny carried one to the compost pile. Then tried on her sunglasses right side and wrong side up, then carried another weed to the compost. Then surveyed all of the other beds. Then carried another weed to the compost.


Tuesday, June 2, 2015

The Staff of Life

It's not secret that my very favorite food is bread of any type. As I've been working less hours and spending more time with my granddaughters, I'm taking the time to bake our bread to help keep the costs down.

I get a lot of comments from people that make me laugh. Things like "I didn't know you could do that at home, I thought only bakery's could do it..." and "Doesn't it cost more to make your own?". The answers to both are a resounding NO. (Insert obligatory smiley emoticon here.)

It's been a couple of years since I costed out baking it myself, but the last time I did it was about $1 to $1.25 a loaf depending on what type I make. I think the cost of flour has gone up, but otherwise, it's still pretty close. Considering that a loaf of bread that is of the quality that I want to eat is between $3 and $4, I think I'm coming out ahead even with my labor costs. And that being said, I've never felt like it was work and less so since I've started using my 
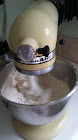
Kitchen Aid Mixer** to knead it instead of doing it myself.

I usually use the method outlined in The Tassajara Bread Book**, by Edward Espe Brown. He utilizes a sponge which consists of water, yeast, a sweetener, dry powdered milk, and about half of the total amount of flour needed for the number of loaves being baked. I use the paddle attachment from my Kitchen Aid mixer to beat on medium speed for about 2 minutes.

I am fortunate in that I have an older oven with a pilot light so it is the perfect proofing environment for my bread. I let it proof for about an hour covered with a sheet of plastic and a kitchen towel. If it goes longer, it will develop the flavor and you will taste more of the fermentation than you would normally.

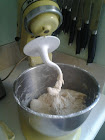
After it proofs, salt, oil is mixed in and then the rest of the flour. I knead it for about 5-7 minutes with the kneading hook on medium speed. If I knead by hand, I will make a smoother and less sticky dough, but with the kneading hook I can keep it somewhat wet which I prefer. It seems to make a better sandwich bread if I do.

I then turn the dough out into an lightly oiled bowl, turn it to coat all surfaces and cover with plastic sheet and towel as before. The first rising is about 50 minutes, or until doubled. You will then need to punch down, or "de-gas" it. I do this by pushing the ball of dough flat with the heel of my hand, and then folding over the dough, turning it and repeating a few times.

Let rise a second time, this time it will take about 40 minutes. After punching down the second time, divide the dough into the number of loaves you plan on baking, You can roll out with a rolling pin, but honestly, it takes the same amount of time and the same results to just push it out with your hands into a roughly rectangular shape. Roll into a log, pinch the seam to seal and put seam side down in an oiled or greased bread pan.

I use stoneware loaf pans.** I LOVE them. I get an evenly browned crust and they are so easy to clean.

Cover as before and let rest for 20 minutes. Bake them in a preheated oven for about 45-60 minutes depending on your oven. (Mine takes 45.) They are done when the crust is browned and they sound hollow when you thump them on the bottom. (Just tip them out of the pan to check, if they aren't done, tip back into the pan and put back in the oven.)

End to end, it takes about four hours to bake bread, but only about 20 minutes of active time. I usually start it first thing after breakfast and the loaves are done and ready for sampling by lunchtime. I usually bake two loaves at a time, mainly because I have a very small oven and that's all I can fit.

My mother always baked bread when I was younger and I still remember the smells and how wonderful it was to have a slice of fresh bread with butter and honey as an afternoon snack. Bread is the staff of life - it's versatile and comforting. Not many things can fulfill us in the way bread does.

**Affliate Link

Monday, June 1, 2015

Mother Earth and Mother Sauces

In planting my garden, it's bringing back memories of my favorite thing to eat in the early summer, baby red potatoes and fresh peas in a cream sauce. It has everything I love, potatoes with the fresh sweet taste of the peas and cream sauce. Who can go wrong with cream sauce! There is a reason why it's a mother sauce!

My grandmother used to make this from the early harvestings from their garden when I was a girl. My grandparents always had all kinds of fresh food at hand. I have never figured out if the fact that their entire back yard was under cultivation was due to my grandpa hating to mow or if he just really loved to grow things. I think that if there had been a zombie apocalypse in the late-70's or early 80's in Vancouver Washington, the whole family could have survived at least two or three years between the garden and the canned found they put up and stored in the garage. 

Back to Mother Sauces. We can credit a couple of men for inventing the concept of mother sauces. The first was Marie-Antoine Carême who initially defined four sauces. They were refined further by Auguste Escoffier. These are the main five used in classic French cuisine today: 

  1. Béchamel sauce - this your basic cream sauce and is the one I make the most and the one that sauced the potatoes and peas growing up. 
  2. Espagnole sauce - I'm not sure I've ever made one. I'll have to do some research on this one. It's basically a reduction of veal or beef stock with various seasonings, meat and vegetables added.
  3. Hollandaise sauce - one of my favorites! How else would we have Eggs Benedict or Lemon Curd!
  4. Tomato Sauce - this requires no explanation. 
  5. Velouté sauce - "Velvet" sauce. Made with a light stock such as Chicken or Fish and a blonde roux (equal parts by weight of butter and flour). The stock is kept light by not roasting the bones prior to making the stock which keeps the flavor as well as the color lighter.
My version of béchamel is as follows: 


  1. In a saucepan over medium heat, melt two or three tablespoons of butter. 
  2. Whisk in the same amount of flour, a sprinkle of white pepper and a pinch or two of salt. Continue whisking while it cooks. It's done when it smells like a freshly baked pie dough. 
  3. Remove from heat and whisk in a cup of milk. It works better if the milk is room temperature or slightly warmed. 
  4. Return to the burner over medium heat and continue whisking until it begins to bubble. Turn down slightly and continue to stir until thickened
Use less flour/butter for a thin pourable sauce and more for a casserole type sauce like Macaroni and Cheese. 

I add grated cheese (cheddar and Parmesan at the least, but usually whatever I have on hand) to make macaroni and cheese or vegetables, fresh or sautéed to make a comforting side dish. One of my favorites is to add blue cheese and toasted walnuts and serve over tortellini with fresh spinach stirred in at the last and some fresh basil as a garnish.